Monday, November 23, 2015

Mead! The Adventure Begins...

Mead has had a long history alongside men during their stay on Earth. It has fantastical stories where it's held in the highest regard among kings and gods.It was once said by Vikings that the mead made from the blood of a god, and honey would turn a man  into a scholar.

Mead, or honey-wine is still a beverage that graces tables to this day.It may not hold as high a covetous repertoire, but still is enjoyed by many.

The earliest surviving description of mead is in the hymns of the Rigveda, a sacred book of Hinduism.
In Ancient Greece, mead was said to be the preferred drink. Aristotle discussed mead in his Meteorologica and elsewhere. The Spanish-Roman naturalist Columella gave a recipe for mead in De re rustica, about AD 60.

"Take rainwater kept for several years, and mix a sextarius* of this water with a pound] of honey. For a weaker mead, mix a sextarius of water with nine ounces of honey. The whole is exposed to the sun for 40 days, and then left on a shelf near the fire. If you have no rain water, then boil spring water."
*- A sextarius is the equivalent to one pint.

What sort of re-enactor would I be if I didn't try my hand at mead at least once? Not to say everyone should try it, but I like medieval food... and I dare say.. LOVE mead and beer. So I asked the help of a friend who had experience, and told me what I'd need.

3 - 5 lbs of honey
1 gallon carboy
1 airlock
1 package of yeast ( I got a champagne yeast)
Water

I had everything I needed... now I just needed to put it all together. Admittedly it took much longer to get everything assembled than originally planned, but it's now fermenting away in a friend's closet.

So we dissolved the honey with water and let it come to temperature. About 120 degrees. Once it reached that point we took a small amount of it and let it cool. We then added the yeast to that and let it sit for about 10 minutes.

While the yeast sat, my cohort peeled and chopped apples. We began placing them in the carboy with the contents of one full vanilla bean and a dash or orange water (because it's period!)
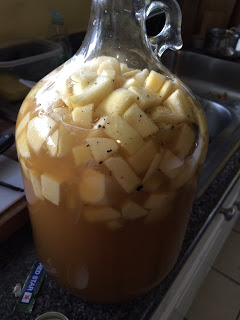
Here it is! Ready to ferment and become alcoholic and delicious...

We then put the honey and water mixture in the carboy over the apples we already added. Once that was in, we added the pitch (yeast mixture). Once it was added we gave it a nice jostle to make sure everything was incorporated well.

Now a few notes: We probably should've pureed the apples or made them a lot smaller chunks. This make it easier for the yeast to digest and break down. It also takes up less volume in the carboy - therefore giving you more mead when it's done.

It's been sitting for a little over two weeks now! And it's bubbling away. In about two more weeks, we'll strain it into another carboy without apples, and let it sit for about 6 months!

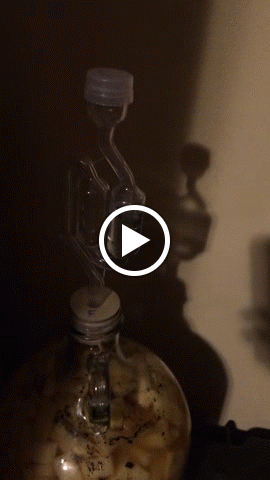
Here's a short video of it bubbling away! This is what we're calling our "first born" until we taste it...
Once we start our next steps, I'll be sure to try and update. Leave comments below on your own experiences, and thoughts. This is very new, so any and all feedback is very very welcome. Thanks for reading!

Friday, September 18, 2015

An "Offal" Meal Indeed

Over this past weekend, I had the opportunity to visit with some friends in Maine. This just so happened to be the same friends that helped me run the dayboard for EKU. Since Neville and I obviously both share a fondness for food, as soon as we set a weekend we started planning a menu.

We came to the conclusion to go with something obscure. I like the opportunity to work with ingredients I don't normally use, and this time we did just that.

Neville was able to get some ham-hocks at the grocery store for a very reasonable price. We also had bacon to supplement and add bacon fat to the dish. Ham-hocks are a very tough meat, and to prep them we needed a few steps. First, we boiled them for about 20 minutes. Then we placed them in the oven with some spices for about 30-45 minutes. This gave the ham-hocks a much better texture and really made them easier to eat and enjoy.

Now, you might be asking... "What did you do with the ham-hocks?!". What any good medieval reenactor would do... I put it in a pie!! Of course, it was accompanied by some regularly used period ingredients - onions, carrots, peas, milk, and bacon!

We didn't just make the pie, though. I also threw in my favorite side dish from Libra de Cocina, Bacon and Leeks. I also used another recipe from the same book - Cheese Fritters. These three things together made for a very well rounded, delicious and very medieval feeling meal. I also made a few condiments for the table as well, although slightly less period - still delicious.

From left: Our ham hock pie, a spicy mustard, rice with leeks and bacon, tomato butter, bread, the last cheese fritter! (the other were eaten before I got the photo), and the second pie.
It was a full dinner for about 6 people, with some of the second pie leftover. I was very happy to cook for these great people, and would gladly do it again. I'm slowly learning more and more about period cooking and recipes and hope to continue to hone these skills. My next adventure will be mead! Definitely stay tuned for that if it's your thing... I'm thinking a vanilla bean and orange water combination - sort of a medieval creamsicle?

For now - enjoy my "Offal" Pie recipe!!

"Elvira's Offal Pie"

Feeds 6-8 (Makes 2 pies)

4 Ham hocks
1/4 lb of bacon - chopped
1 c peas
1 1/2 c carrots - diced
1 c onions - diced
1/4 c of cream
5 egg yolks - whisked
1 tsp thyme
1 tsp of pepper
Salt to taste (the pork should have enough salt - additional shouldn't be needed)

Preheat your oven to 350

Take your ham hocks and boil them in about 6 cups of water (as much as you need to cover the ham hocks) for about 30 minutes. KEEP THE WATER FROM THE HAM HOCKS! You can use it to cook rice in as a side dish if you so choose, but you'll need about 3 cups leftover to make the rue, and bake the ham hocks in.

Once they have boiled, place them in a shallow baking dish. Add 1-2 cups of water to the dish. Add seasonings to your taste. I used tarragon, thyme, sage, and bay leaves. Once you've added your spices, place the ham hocks in the over for 30 minutes.

While the ham hocks cook, place 1 cup of the leftover water in a saute pan. Let it come to a simmer and add your flour. I added a small amount of butter here as well, but it's not necessary. Once you have your desired consistency, add your onions.

If you're using pre-made pie crusts - take them out of the fridge if you haven't already. Otherwise they'll be hard to work with when it's time to fill them with this offal mixture (*snerk*).

Once the onions have cooked, add your bacon to the pan.

Once the bacon is almost fully cooked, add your carrots, and peas. By this point, you will need more liquid, so here's where you add that 1/4 c of cream.

Bring this all to a boil and let it simmer while you wait for the ham hocks to finish in the oven.

Once the ham hocks are done, chop the mean into bite sized pieces. We had about 3 cups worth once it was all cooked and chopped. Add the chopped ham hocks to the saute pan and cook for about 5 more minutes.

Lay your pie crusts out, in your pie pans. And then ladle in a few cups of the offal mixture. Pinch your crust around the filling, and fold over on any gaps. This makes for a pretty presentation. Once your pies are filled, pour the egg yolk mixture evenly over it. Bake this for 20 minutes at 425.

Once your oven can no longer contain it's excitement and dings at you, remove the pie from the oven and let it cool for about 5 minutes.

Then enjoy!!!


Thank you so much for reading, and please - comment below if you try this and let me know what you think!!!

Wednesday, September 16, 2015

My First Dayboard

So East Kingdom University was in April in Bangor, Maine. Awhile back I had decided to try my hand at preparing a dayboard for an event. I've always loved cooking, and as my persona that of an Osteria owner, I felt it only appropriate.

I was given the opportunity to prepare the meal for about 200 people. I wanted it to be warming, good, and as close to gluten free as possible, while still being period. I went with the basics. A pottage, a meat, fruit, cheese, and rice. All items are of course period, although the chicken thighs a more "high end" options for some during those times.
The line for dayboard. The hallway was short, but the line extended down the adjacent hallway.
The first item, was a pottage. Garlic, Onions, Potatoes, Carrots, Celery, and  Bacon. Boiled in salted water with pepper. The carrots did not end up as soft as I would have liked, but for later reference will pre-boil them to get the desired texture.

The rice was a brown rice, with garlic. Nothing fancy, but still apropos and yummy. There was also bread, with a garlic butter and an orange butter to offer. Very easy, but delicious.

The chicken was baked, and served cold. Rubbed with oil, and salt and pepper before cooking. Also went over quite well.


 The rest was simple fare. Sliced Cheese, Cottage Cheese with Sage and Thyme, "Scarborough Sauce" (a special sauce of mine that is secret weapon), sliced oranges and apples, strawberries, and pickles. Here is a photo that someone graciously took of their plate. 

Someone's perfect feast gear graciously decorated the dayboard. Top right is the pottage, and on the plate (clockwise from the right) chicken, strawberries, pickles, brown rice with garlic, apples, cottage cheese with herbs, carrots (from the pottage), and bread. 

It was my first attempt, and a successful one. However, there was no way I would have been able to pull this off without the help from my wonderful kinsmen. To Lord Neville and Lady Kathryn, I thank you. And to Lady Finnoula, my household, Lady Shyvan, Mama and Papa Longstrider, Sally, Aziz, and anyone else I may have missed (with my most sincere apologies) - None of this would have been possible without you. Your help and company made this a wonderful experience. I'm forever in your debt.

The hard work put into the dayboard was not unnoticed. At GNE this year, I was awarded with The Queen's Honor of Esteem for preparing the dayboard. I learned that a dear friend had written me in.


Unfortunately I wasn't present in court to receive it because I was...  cooking breakfast for my household. I have a favorite place when at an SCA event... and it's in a kitchen. Thanks again for reading! Stay tuned for more posts!

Monday, March 23, 2015

Lemon and Lavender Sekanjabin

During the middle ages, a common drink for people was Sekanjabin. It was a vinegar and sugar mixture that was diluted with water. It was believed to promote good health, and is dated back to 10th century Persia. The term ‘sekanjabin’ comes from a persian translation of “sirka anjubin”, meaning “honeyed vinegar”. It’s a common drink served at a lot of SCA events, and is commonly called medieval gatorade.


Within the last year or so I’ve started to dabble in medieval cooking. I’ll be cooking my first dayboard in a few weeks, and thought my table couldn’t go without a drink or two. Sekanjabin is a go to refreshment option, and I’m going with an Andalusian / Spanish style meal so it only seemed appropriate.

I recently acquired some lavender, and a small herb garden that has some lemon verbena. I haven’t been able to find documentation for it before the 1700s, but the flavor and smells it releases are totally worth it. Lemon and Lavender are becoming a really popular flavor combination too, and I thought why not try making a sekanjabin with this same flavor combo.

I started with the basic mixture of vinegar and sugar. I took two cups of white distilled vinegar, and one and a half cups of sugar and put them over medium heat. I stirred it all together until the sugar dissolved, and then added my herbs.

I wasn’t sure how much to add so I took a few small sprigs of the lemon verbena (about 10-15 leaves) and a small handful of lavender. I stirred it all together over a gentle boil until the lavender was no longer purple, and the leaves wilted. The smell of course left something to be desired naturally. All I could smell was vinegar. Don’t let that discourage you, though!

After it was done cooking, I took the mixture and poured it through a strainer into a mason jar. No one wants a solid piece of lavender in their water. I let it cool until it was room temperature and then decided to test it. I added a very small amount to a 4 oz glass of water. About a tablespoon.


SUCCESS! I feel the lavender flavor didn’t come across as much, but you smell lavender as you drink it, and you taste lemon. The lemon flavor was pretty strong, but made for an interesting drink all together. The amount I used is a very small batch, about half a standard size mason jar (so about 3 ounces).  Obviously you can increase accordingly. Let me know if you like it, or maybe try a variation of the same! Thanks for reading!

Lady Elvira’s Lavender and Lemon Sekanjabin


2 cups of white distilled vinegar
1½ cups of sugar
3 Tbsp of dried lavender
1 Sprig (about 3-4 inches) of fresh Lemon Verbena


Add vinegar, and sugar to a small saucepan and put over medium heat. Stir until the sugar has dissolved. Bring the mixture to a soft boil and add your lavender and lemon verbena. Stir this until the lavender buds have lost their color and the lemon verbena leaves have significantly wilted (about 5-10 minutes).

Pour the mixture through a strainer, or cheesecloth (something with small enough gaps to catch your lavender and leaves) into a small container. A mason jar works well for this. Wipe off your container as the mixture will get a little sticky.

Add about 1 to 2 tablespoons, depending on your taste to a glass of hot, or iced water and enjoy!

Monday, February 23, 2015

14th Century Hood Part 1 - Constructing the Lining


In the SCA, some folks really like to go all out and create a lot of their pieces (or all of their pieces) by hand. I am all for it, but in most cases just personally don’t have the time or patience. Most of my work right now is indeed, machine sewn. I’m not against doing hand sewing from time to time however.

I’ve only been in the SCA for 3 years, and have just recently gotten my AoA (Award of Arms). I’m merely trying to find what skills suit me best, and trying to hone those skills to get the most out of my experience.

To enhance said experience, and really make an attempt at period construction of a garment I decided to try hand sewing a 14th century hood. It’s not an uncommon piece of clothing in the middle ages, and was quite popular from at least the 1300s to the 1600s. The Viking version of the same garment is a little different, but the same basic idea and functionality.

Worn by both men and women, hoods were a common head covering for people. Most examples
Period Illumination featuring two hood wearing people.
found are merely one layer of fabric, but for more affluent people during the time it bet it wouldn't be unheard of to have a lining fabric to offer added stability and warmth during colder months. I don’t have any documentation for this. If there isn’t, this is just a theory. If there is, well… I stand by my statement.


I decided to use a heavy black linen for the main body of the hood, and a salmon colored cotton blend for lining and buttons. Now, you might be asking yourself - “How is the color salmon historically accurate?”. Great question! I asked myself the same thing. Apparently madder root (Rubia Tinctorum) offered many colors in the red spectrum during the middle ages. My fabric wasn’t naturally dyed in this case, but the color is indeed accurate.

I conveniently had the matching thread (because I usually buy a matching spool when I buy fabric), and decided to get to work. My friend, and teacher within the SCA draped my pattern fabric (a thin white cotton) and fitted it properly. As she has some background in fashion design she had no trouble getting it to drape as it should. In no time at all I had my hood pattern cut out, and was laying it on my fabric. 


Forgive my fabric weights, and cutting table. I have limited space to work on. First I cut out the parts of the pattern in the lining fabric. As you can see in the middle image above, an extension was added to the original pattern. This addition is what is known as a liripipe. A liripipe was common on hoods, and varied in length from modest to floor length. Not all hoods had a liripipe attached, such as those in the Viking version. No evidence has been found that liripipe length related to a status of a person or anything of the like. It just seems to be a fashion choice. In the event of a longer liripipe it could be worn around the neck as a scarf for extra warmth.

Once the pieces were cut out, I started working on the lining. A blanket stitch was done around all the edges, and on the seams. Once that was done it was easier to see what the hood would look like when finished.


entheogenicmonk.instagram.com
Once that was constructed, I started constructing the black outer piece. It seemed a little much to put it all in one blog post, though. Please stay tuned for the second half of the blog post! I'll be finishing it up, and providing a button and button hole tutorial. Thanks again for stopping by!


Wednesday, February 4, 2015

My first Italian gown...

   So the East Kingdom hosts a large event every year known as Birka, named for the Viking trading town from the middle ages. The event hosts a huge merchant area filled with the most wonderful fineries, a bear pit and fencing tournament where heavy list fighters and fencers test their mettle (and metal). After court is held there is also a ball, and a hafla. Not to mention there is an Arts and Sciences exhibit, and classes for people to take part in. The event has a little something for everyone.

   Our household, House Strangewayes strives to dress our best at this event every year. We pick a household theme, and each of us create attire based in our chosen time period.Our household's chosen time period run the gamut from early period Viking, to late period Italian. We have a little bit of everything. Below, is a wonderful family photo taken by our household member, and my friend Heather. Her SCA name is Bianca Angoussola.

Photo Credit: Heather Fitzpatrick
From left (Back Row): Lady Syele von Heidelberg, Lady Simona bat Leon, Lord Thothreker Ogaefa, Erdene Qadajin, Lord Fearghas MacGreggoure, Lord Hermankyn, Master Ekk, and Hongo Ryotaro Mitsuyoshi
Front Row, from left: Lady Cecily Windham, Lady Bianca Angoussola, Maestra Julia Agriccola, Lady Fortune St. Keyne, Lady Elvira Violante Ballesteros, and Lady Lysken die Waeyer.
Front (with the awesome hat): Jacquemine Van Bel


   What you're looking at is a late period Italian gown with detachable sleeves. A white linen chemise underneath. Accessories are a black snood with pearls and gold beading, a circlet adorned with a bee. Earrings and necklace both made by me. The earrings are a pearl drop earring with a gold cap on them. The closures aren't quite period, but I was working with what I had. The necklace was a redesign of a previous blog post I had done. I changed the sizing of the pearls, and I adjusted the spacers. The belt was a chain belt made from long bronze clearance necklaces at Charming Charlie, and a bee pendant I found last minute at Michaels.

   If you look closely you can see a cross hanging from my belt as well. This was semi common during this time in Spain and Italy. My persona is more attuned to the religious side of things so I felt it appropriate.

A great side view of the dress. Photo credit to Jason Taylor.


   Here you get a little glimpse of the cording I had made for the side lacing. This was done via finger loop braiding and serves the same basic purpose as lucet cord. I have to redo this part, and add more rings but I was quite pleased with this. At each end of the cord is an aiglet sewn onto it. They're gold colored aiglets, and add a little shimmer (and who doesn't love that?).

   I certainly have quite a ways to go in getting that perfect dress but believe me when I say I've come a long way, baby. Hopefully next Birka will be even fancier!

   Thanks again for reading!

Friday, January 2, 2015

Pelicon: The Begining


So I was perusing Pinterest recently, and I came across a pin from one of my favorite SCA Pinners, Fortune St. Keyne. She had pinned an image I had never seen before:

http://media-cache-ec0.pinimg.com/originals/43/72/1a/43721ac5140ad2bf4c79eb8c6c2a6eed.jpg

I'm not certain of the origin of this image, but the garment this woman is wearing is quite interesting. It's called a pelicon (pronounced with a soft c), and Google is less than helpful when trying to research it. Pinterest however, gave me at least a little more to sink my teeth into.

I came across this image as well when searching Pinterest, and it only helped confirm a few theories I had on how it was worn and constructed.


The image led me to this site, that gave a little blurb about the garment and its styling and construction.

"At the end of the 13th century the Pelicon, a feminine version of the Garde-corps, makes its appearance. This is made of a large elliptical piece of fabric, measuring approximately three and a half metres on its longer axis. Worn, the fabric falls softly from the shoulders to the feet and forms a train at the back. Like the Garde-corps, the Pelicon is made from a heavy fabric bordered with fur and completed with a hood. The head opening is cut at approximately three-quarters of the length of the ellipse, where the separately cut hood is buttoned up to the collar."

Upon reading that description I felt comfortable in my assumption that is was an odd hybrid of a surcoat and a houppelande... but with a hood. The hooded aspect is whats really grabbing me, and the contrasting lining fabric that shows when the hood is left to hang off the shoulders. It also doesn't help that the trim in some of the examples is fur, and I happen to LOVE fur on everything.

A fellow household member is making one for Birka so it'll be interesting to see what she comes up with. I've seen a few variations without the hood, and just a very high buttoned neckline - much more similar to that of a houppelande, without the sleeves.

I'll be doing my own interpretation of it at some point. I've got some red silk that is dying to be made into a cotehardie, and I think this would be the perfect addition to that dress for those cold, wintery events *cough* Crown Tourney *cough*.