Showing posts with label quintavia. Show all posts

Friday, June 30, 2017

Pinky Out! - Rings in Period

Jewelry is a wonderful accessory for any re-enactor. It comes in many shapes and forms, and elevates any kit. I've had a small fascination with rings recently. Specifically the ones worn in the middle of the finger, commonly referred to as "first knuckle rings".

Portrait of a Lady - Filippo Lippi - 1440
I've seen quite a few examples of rings being worn this way, and admire the quirkiness and subtlety of them. It's also a current trend in mundane society. Most jewelry was used to show a sign of status and wealth. Even if it might not fit my persona exactly, I always need to up my court garb game... right? This is what I keep telling myself so I have an excuse to obtain one.

Portrait of Madalena - Raphael - 1504
A dear friend of mine is a jeweler and when I was discussing the rings with him, he perked right up and told me we could make one that very day. I didn't want anything too elaborate, but I certainly wanted something that would easily be period, and would "enhance my aesthetic".

It was a very simple process. Undoubtedly more simple than it would be for a jeweler in period to complete. I would like to do more research on how jewelry was crafted in period, later down the road. At the time, though I was just excited to have the opportunity, regardless of creative process.

My finished product!

Not to mention, the emeralds were harder to come by and a lab created option wasn't exactly available then. Nevertheless I persisted. After just a few short hours, and helpful guidance of my jeweler friend, I had a first knuckle ring of my own.

The process to make the ring itself might not have been very period, but the outcome I feel is quite apropos. It ended up being a lab created emerald in sterling silver.

I'm not particularly fond of gold, not to mention it's considerably more expensive. I'm pretty pleased with the outcome, though. I would like to try a ring with a square stone next, as I'm seeing those shapes as well. Round stones seem to be fairly less common from what I've seen. Perhaps I'll dabble in some granulation to help make my next ring stand out more. I'm hoping to get more time at the jewelers bench this year. I'm still mostly focused on food, but a little bling never hurt anyone.


Tuesday, May 30, 2017

Pomegranate Chicken Part 2 - The Motherdish

About a year ago, I posted a recipe for Pomegranate Chicken. Loosely based off of a recipe I had come across from Liber de Coquina, a 14th century cookbook. There is some debate on whether the book is originally from France, or Italy but currently resides in the Bibliotheque Nationale in France.

The original manuscript in Latin calls for almond milk and cinnamon. Being the pomegranate is very sweet to begin with, I decided to not channel the sweeter, creamier side of things and went a savory route. In the original recipe, it even states "However, it can be broth green with herbs. [loosely translated by Google from Latin]" which I interpreted as an option to make an herb focused broth for the chicken.

The original recipe (in Latin) is as follows:

"De romania: de romania, suffrigantur pulli cum lardo et cepis et tarantur amigdale non mondate et distemperentur cum succo granatorum acronum et dulcium.
Postea, colletur et ponatur ad bulliendum cum  pullis et cum cocleari egitetur. Et ponatur species.

Potest tamen fieri brodium uiride cum herbis."

The translation that Google provided wasn't exactly the best (other than the last line of text offering a more herbaceous alternative).


" On Romania, from Romania, suffrigantur chick with bacon and onions and terantur almond pomegranate juice with no mondate and distempered Acroria and sweets. Then, collet and set for boiling with chickens and spoonfuls of disturbance. And a kind.

However, it can be broath green with herbs."


I decided to do more digging on a possible alternate translation.

I came across a translation from Euriol of Lothian that went over their redaction of the recipe. It too included the almond milk, and cinnamon option with no mention of the alternate. Their translation did offer a clearer glimpse into how the prepare and cook the chicken, though. Euriol's recipe translation can be found here.

I hadn't found an alternate broth recipe for the chicken yet, so I decided to make my own using what I thought would be an educated guess at ingredients. Mixing a little Andalusian in with it (as per my persona) I came up with the recipe you see below. It is shown next to Euriol's for comparison.

Euriol of Lothien’s Pomegranate Chicken

1 whole chicken
1 small onion, diced
1 tbsp of olive oil
¼ tsp grains of paradise
¼ tsp ground ginger
¼ tsp cinnamon
1 c almond milk
1 c pomegranate juice

Cut the chicken into 8 pieces ( 2 drumsticks, 2 wings, 2 thighs, 2 breasts) and season with salt and pepper.

Heat oil in a Dutch oven or 6 quart stock pot.


Brown chicken in oil, turning at least once to brown each side. Remove chicken and set aside.

Add onion and sauté until translucent.

Add remaining ingredients, and reduce heat to simmer.

Let stew until chicken is tender and garnish with pomegranate seeds if preferred.


Lady Elvira’s Pomegranate Chicken

12 lbs of Frozen Chicken Wings
750 ml of Pomegranate Syrup
4 Sprigs of Rosemary
4 Tablespoons of Minced Garlic
2 cups of Parsley
1/2 c of Soy Sauce

Bake the chicken in the oven as directed on the package.

While the chicken is cooking, combine the sauce ingredients and set aside.

Once the chicken is cooked, let it cool for 10-15 minutes.

Place your chicken in a container of your choice (I used an aluminum pan) and add the sauce.

Let it refrigerate overnight.

Cook on low heat for a few hours, moving chicken regularly to get even flavor distribution.

Once the chicken looks caramelized, it's ready to plate.


In the original recipe, only a cup of pomegranate juice was used, but it was for a single chicken. Being that I was using 12 pounds of chicken versus a single bird, I increased the pomegranate juice. I had also seen rosemary used in Liber de Coquina in a fish dish.

Murri (which I substituted with soy sauce) was a little bit of a stretch. I've seen it used in Andalusian cooking of course, but I haven't found definitive use in Italian cooking. Also, considering this book is either French or Italian further lessens the likelihood of murri being used. This was merely a liberty I took in relation to my persona. 

The original recipe called for onions, which I tend to avoid for allergy reasons. I used garlic instead, and added parsley to lend more herb flavor.

The chicken also doesn't sit nearly as long in the juice in the original recipe. In period, overnight marinating wouldn't have really been an option. I wanted the flavors to get into the chicken though, so I took liberties with this step. Extended cooking was a method to promote tender meats so I still utilized that to give the chicken the tender texture mentioned in the original recipe.

My interpretation is clearly more on the anachronistic side of things, but there were indeed bases built off of period recipes and methods.


Tuesday, April 11, 2017

Food and the SCA

When I started playing in the SCA - I didn't know what I wanted to focus on (if anything). At first socializing, and spectating were my primary involvement. There's so much to do that it took awhile for me to come into my own. Eventually I fell upon a cooking adventure and it's been a love of mine ever since.

A plate from my first dayboard - April 2015
Two years ago I planned my first dayboard with the help of some friends. It was EKU in the Barony of Endewearde. It was a great learning experience, and very very scary for a first attempt. The site location had been changed with less than 24 hours notice, and the cooking space went from a large kitchen - to a nook in a hallway with 6 outlets.

That being said, we all pulled together and the event went off without a hitch. It was fun for everyone involved and at the end of the day a complete success. After that, there is very little that could scare me from cooking.

Food is love to me. It means sitting down with friends and family and enjoying time together. Eating together. Sharing an experience, and making memories. Even when I'm cooking it's a sharing experience. I get to cook with some great people. We share a passion about food and run little tastes of things we're making back and forth across a kitchen.  Or we'll discuss recipes we tried or had come across in our research. It's love, and it means something to me. It has helped mold my experience within the SCA.

The appetizers from Hafla 2017
Over the weekend I got to cook at one of my favorite events, Hafla. It's a Middle Eastern themed
event with dancing, music, and delicious food. I got to cook with my friend, Aleksei and it was a great time. We shared recipes, cooked together, and despite my accidentally biting him - I'd say we had a good time. He was feeding me lamb and I got his finger on accident... I didn't hurt him! There'll be an upcoming blog post on that soon (Hafla - not my biting Aleksei).

I've learned a lot of recipes over the years, and have met a lot of great people. I'm still amazed at what food can do for any kind of relationship. It helps close gaps that might have been there before. Sitting down with a total stranger who, like yourself has never had stuffed dates, or rabbit before. You now have that. You tried it together, and hopefully became acquaintances or friends because of it. Or maybe you went to a cookery class and met someone else on the same journey you are. It's such a great experience on so many levels, and I only plan to share the love.

Thursday, February 2, 2017

Bycocket, I Think She's Got It!

Ever since I joined the SCA, I've wanted a bycocket. I especially wanted one when I found out what they were called. It's just too much fun to say!

The original pattern found on Honor before Victory
I remember seeing someone wearing it so nicely with a simple veil and a cotehardie many years ago at an event. The combination itself was enough to have me intrigued. It would be some time before I made the attempt, but always had the vision in my head.

The opportune moment came at this year's Market Day at Birka when Queen Anna issued an "Accessories" challenge for the fashion show. House Strangewayes also had a personal challenge of "Tips and Toes". This was my "excuse" to try something I always wanted to, and finally had the courage to do so.

I ended up going with a pattern found on "Honor before Victory" - another SCAdian blog showcasing a GORGEOUS bycocket made for an elevation. The pattern itself seemed simple enough so it was the one I decided to go with. I didn't use the split loop seem method as suggested in my reference, but I used the basic pattern included with it.

I decided on linen and silk in contrasting colors for my first attempt. Most of the bycockets I had seen were primarily made with wool felt, and sturdier cloth - so I used canvas as an interlining to give it more support.

The tip of linen layer needed to be trimmed later on.
I started by measuring around my head, to make sure it fit, and measuring the "height" the crest of the hat would be. Make sure you measure the width of your head, so your hat closes at the top (I have a pretty big noggin, so this is important).

Once I had those measurements I followed the diagram I had found, and tested out the fit. It was perfect. After that step was taken care of I cut out the layers of silk and linen. I ended up making the linen layer longer than the silk, since this would form the rim of the hat. I wanted to give it a little more space to make sure it'd be long enough to sew up the brim of the hat without issue.

The completed bycocket! (sans feathers)
I did initially serge the pieces together, and used a machine to construct the two pieces individually. The rest of the hat was completed by hand. Because the silk had a diamond pattern to it, I decided to use a small blanket stitch down the center of the hat, and an invisible stitch along the brim. The total amount of time I would say it took would be about 4-6 hours total.

I would definitely recommend trying your hand at one of these if you've ever wanted one. This ended up being much easier than I had originally anticipated. You don't necessarily have to do the finishing by hand, but I preferred doing that to go with the outfit overall. I think I'll try to make another one eventually, but for now I'm still very pleased with this one and how it came out.

Thanks for stopping by (cocket)!

Monday, January 16, 2017

Getting Your Morels in Order...

Mushrooms have a deep history and date back over 10,000 years. Used primarily in medicine, this ingredient had played an integral part in much of ancient European, and Asian history.

They seem to experience a slight recession in Europe in the middle ages. More than likely due to the taboo of poison and treachery - they were probably avoided. Either that, or they weren't used often by nobility - so the lack of documentation may just mean they were used by common people. Thus the documentation (or lack thereof) is pretty understandable.

Whatever the cause may be, they're still a popular and tasty addition to any feast or dayboard.

Mushrooms are very affordable, and they're also a great vegetarian / gluten free friendly option. Most people seem to like mushrooms, but there are some of us (myself included) that aren't the biggest fans. Keeping that in mind, I tried to pair them with flavors more widely enjoyed.

What I came up with was a very easy, tasty, and "period" recipe that will be sure to please most anyone attending a feast or dayboard of yours.

This recipe is for one pound of mushrooms. It can be increased as needed. Depending on your dietary needs butter can be replaced with oil, but I suggest halving the amount of oil if so, and letting it sit with the herbs in it overnight for maximum flavor payoff. 

Lady Elvira's Morels

1 lb of white button mushrooms
1 stick of salted butter *
1 sprig of rosemary (stem removed)
2 Tbs of minced garlic (I use the jar stuff and also add a teaspoon or two of the oil)
1 small bunch of parsley
Salt and Pepper to taste

* - You may use unsalted butter, if that be the case - merely add salt later on.


  • Remove the stalks from the mushroom caps (save the stalks for another recipe if you wish)
  • Clean caps thoroughly
  • Place top side down in an aluminum dish (must be high enough to catch melted butter)
    • It is okay if you have to stack mushrooms on top of one another
  • Place your butter, garlic, and herbs in a microwave safe dish and heat until melted
    • Let this sit for 15-20 minutes 
  • Once your butter has settled, gently pour the mixture over the mushrooms
    • Be sure to distribute butter as evenly as possible
  • Cover and refrigerate overnight
These can either be grilled, or placed in the oven. To cook in the oven, place aluminum pan in oven heated to 350 degrees. Cook for 20-30 minutes. 

When grilling - cook over  medium high heat for about 45 minutes, stirring occasionally. 


This is a very easy dish to prepare and cook. Whether it be mundane, or period - this is sure to please many a mouth. I hope you enjoy this recipe, and let me know below if you've tried it! 

PS - I'm not sorry for the mushroom pun. It's too much fun....gi. *snerk* 


Tuesday, September 13, 2016

Pomegranate Chicken - Sticky Sweet Anachronism

Pomegranate is a popular ingredient in medieval cooking. I have seen multiple sources for it used in sauces mainly - particularly served with fowl or pork. I personally had never used it in cooking, but came across pomegranate syrup and a lot of chicken (I'll explain) - so there really was only one option.

I was given the task to cook a small lunch for staff at the East Kingdom's Equestrian Tourney this year. With a lunch attendance projected at 20-30 people this was not a difficult meal to plan. It was expected to be hot so hydration and protein were important.

Chicken always goes over well, and it's relatively cheap so it was the primary protein I went with. I had also obtained a bottle of Pomegranate Syrup with the most basic of ingredients (sugar, water, pomegranate juice). I knew it'd be too sweet on it's own, but with a little doctoring it could be quite delicious.

Instead of finding a period recipe, I decided to just go with flavors and items that were (fairly) common. I chose to pair the syrup with murri (soy sauce), garlic, parsley, and rosemary. Albeit rosemary isn't too wildly documented to be used in food - it was used in wedding ceremonies during the middle ages. I'd like to think a curious cook might've given a taste one day and thought it a good idea to add to a dish.

The chicken before it was put in the fridge overnight.
I took chicken wings, and first baked them in a baking tray for about 45 minutes at 350 to let them cook through. While they did, I combined the components of the sauce. I did this by taste, until the pomegranate didn't feel like I'd get a toothache from eating the chicken.

I would gradually add the other ingredients a tablespoon at a time until I felt it was more palatable as a whole. It took a lot of adding tiny amounts of secondary ingredients until it was just right. Once that happened, I let the sauce sit until the chicken was done cooking.

Once the chicken was done, I let it cool for about 15 minutes, and then placed it in an aluminum baking tray (this makes for very easy reheating and clean up on event day). I then poured my sauce mixture over the chicken and let it sit overnight in the fridge.

Getting these ready during event day was simple. I merely had to put them on the camp stove burner and let them heat up. I kept them at low heat for a couple hours. This keeps them tender and again - easy peasy.

The full spread with the chicken front and center.
When they were done, they got plated and put in the "dining hall". It was a small lunch but enough to sustain the staff at the event. The menu in it's entirety was as follows:

Pomegranate Chicken
Garlic Mushrooms
Pickled Carrots
Stuffed Grape Leaves
Assorted Flavored Butters
Sliced Apples
Bread
Cheese


If you're interested in the recipe - Please see below and thank you for stopping by!


Lady Elvira's Pomegranate Chicken

12 lbs of Frozen Chicken Wings

Sauce:

750 ml of Pomegranate Syrup
4 Sprigs of Rosemary
4 Tablespoons of Minced Garlic
2 cups of Parsley
1/2 c of Soy Sauce

Bake the chicken in the oven as directed on the package.

While the chicken is cooking, combine the sauce ingredients and set aside.

Once the chicken is cooked, let it cool for 10-15 minutes.

Place your chicken in a container of your choice (I used an aluminum pan) and add the sauce.

Let it refrigerate overnight.

Cook on low heat for a few hours, moving chicken regularly to get even flavor distribution.

Once the chicken looks caramelized, it's ready to plate.

Eat and Enjoy!

Tuesday, April 19, 2016

Quite a Pickle We're in: Radish Edition

A person walks into the doctor's office. 

A banana stuck in one of their ears, a radish in the other ear, and a carrot stuck in one nostril. 

The person says, "Doc, this is terrible. What's wrong with me?" 

The doctor says, "Well, first of all, you need to eat more sensibly." 

Radishes are far from everyone's favorite vegetable. They're bitter, tough, and not pleasing to many palettes. I'm personally a lover of radishes in most any form. One form I had never tried before was pickling. I love pickles. I love radishes. What better way to enjoy my two favorite things than by joining them together?

Both pickling and radishes date back quite a bit so this is all prospectively period (other than keeping it in a mason jar, of course). Radishes are documented back during the Roman Empire and were said to have come in a variety of tastes, sizes, and colors - much like they are today. Pickles were believed to be made by Mesopotamians in 2400B.C. - and thus a very period, and pioneer food discovery.

It only takes 24 hours for radishes to pickle. So cut them up on a Friday afternoon, and they're ready by the time you have lunch at that camping event on Saturday.

I cheated a little and used pickling spices in this mixture. My next attempt will utilize something a little less easy, but I'm sure they'll still be easy to make nonetheless.

I started with a 32 oz mason jar and filled it with thinly sliced radishes. Every few radishes I placed a smashed clove of garlic, and at the end I topped it all of with white vinegar and pickling spices. That was it. There is indeed a recipe below for your use. I'll also have an upcoming post as well regarding a variation of this same recipe. It's something easier to document ingredients for and seems it might be even tastier, and more period.

Elvira's Pickled Radishes


1 32 oz. Mason Jar
2 Bundles of Radishes
3 Large cloves of Garlic
Handful of Pickling Spice *
Vinegar to Fill

Slice your radishes thinly and place in the mason jar.
Every in to 2 inches place a smash garlic clove in the jar.

Once full, place your pickling spice in the jar.
Fill with vinegar.
Let sit for 12-24 hours.


Viola!


Monday, April 18, 2016

Cheesiest Post Ever - Homemade Farmer's Cheese

Can you see why I needed to make this?
It's even more delicious in person...
There's an SCA event coming up and I wanted to go a little outside of my comfort zone for meal planning. There's a slot of time that I, and three other friends will cook a small "second breakfast" sort of meal and I just wanted to kick it up a notch. Farmer's Cheese was my idea. I had never made cheese before, and didn't know how easy it could be!

Who doesn't love cheese (other than folks that are allergic, of course)? Cheese has been around for over 4,000 years and I've always wanted to try making my own. This event seemed like the perfect opportunity. First, I had to test it though.

It's only takes three main ingredients, and a few commonly found items in your kitchen.

1/2 gallon of whole milk

1/8 cup of vinegar

 A dash of Salt

Those are all the ingredients you need. That's it!


You materials should be the following:

Large stock pot (big enough to fit a half gallon / whole gallon of milk in)

A colander

Cheesecloth
A large spoon for stirring, and scooping
Large bowl for colander (to reserve whey) - Optional

To bring all these together to make yourself some delicious cheese... follow these steps.

Place your milk (either half gallon at a time, or all at once depending on your pot size) in your pan, and turn it to medium heat. You don't want to scald your milk, but you do want to bring it up to temperature.

Some folks like to use a thermometer when making cheese, but I don't think your run of the mill Kitchener in the middle ages had one.. so I didn't use one either.

You'll want to stir this pretty continuously while the milk heats up. A large slotted spoon or ladle works best for this.

Keep this up until your milk just starts to steam and simmer. You don't want it to get to a rolling boil, but it should be steaming a good amount and bubbles should start coming to the top on the sides of your pan.

Once this happens, add your vinegar! Your milk will immediately start to separate. Make sure to stir as it does this, so that you get all that vinegar throughout your milk.

Once lumps (soon to be cheese) start to form, scoop them into your lined colander and let them drain. It only takes a few minutes, and you can gently squeeze it to urge it along. You can place your colander in a clean sink, or in a large bowl to reserve some of that whey! Whey can be used to make a lot of things, so it could't hurt.

Once your cheese has drained, place it in a storage container and add salt. You can also add whatever spices you prefer as well! I tried a small batch with herbs and garlic - it was divine. I'm not sure how long it keeps, I just made it yesterday afternoon. I you like what I've posted here, let me know and I'll be happy to follow up with other techniques and flavors! Thanks again for reading.
Completed cheese - Ready for eating! 


Thursday, April 14, 2016

Mead!: The Adventure Continues

So back in November I posted about our first attempt at making mead. It was a traditional sack mead with a lot of honey and apples. I added some vanilla too which certainly came through during our recent tasting!

Now, when we did our tasting recently we had more than just our sack mead. We had actually done an additional five flavors shortly after the first! Of course we have our ingredients for each one, and wanted to get opinions on flavors before sharing the findings of each.

From left: Sack Mead / First Born, Pear Hydromel,
Golden Delicious w/ Wildflower Honey, Raspberry w/ Turkish Honey,
Pear Hydromel w/ Cacao Nibs, and Golden Delicious w/ Blueberry
 We really wanted to take the opportunity to try multiple flavor pairings and just go from there. We thought about what would taste best together and we were both pretty happy with the results. As were our lovely friends who helped give invaluable feedback.

The one thing that all the recipes we created have in common is that they were all brewed using a white wine yeast, a Cote de Blanc. Our next few attempts will be done with different yeasts and ingredients. Each batch was done in a one gallon carboy, and wielded two 32oz bottles and a one or two smaller "test" bottles. The test bottles from each were what we used for the tasting.

We started with our Hydromels. We had two, the simple Pear Hydromel, and the Pear Hydromel with Cacao Nibs. Even that one ingredient made all the difference between the two.
Pear Hydromel w/ Cacao Nibs

We started with the simple pear hydromel. What gave it the "watered down" quality of a hydromel was making pear juice instead of putting cut, raw pear in it. We then blended that pear juice with our honey.

Once that was done fermenting, we bottled two different batches to build different flavor profiles. One batch was done with cacao nibs, and the other with hops (not shown).

The Pear Hydromel with Cacao had beautiful clarifying on it. We were both really pleased with the color. It had a dry flavor and, as Hydromels tend to go it was incredibly light. There were also slight, very mellow after tastes of chocolate. A nice surprise. I certainly wasn't expecting to get that much of a hint of it.

 Anjou Pear Hydromel
The Anjou Pear Hydromel had no mellow after notes to it. It had a nice, light flavor of a dry white wine without the chocolate. It lended itself a more tart aftertaste than the cacao version, but was just as enjoyable. I made the suggestion of using it in a sangria. Even if sangria isn't your thing, with both of these hydromels they should definitely be enjoyed chilled. Neither seemed to need much more aging, and were quite lovely being so new.

Next up were our two Golden Delicious flavors. We had a simple golden delicious apple with vanilla; and we had a blueberry version. Both were also made with a local wildflower honey. Both of these were melomels and didn't involve us making our own apple juice. That'll be an upcoming attempt when apple season comes around.

The Golden Delicious w/ Vanilla
The golden delicious had a golden opaque color. Not as successful clarifying as our melomels, but for obvious reasons. These were done with small bits of apple instead of a sifted juice. Still a lovely color nonetheless. The aroma was very sweet, as was the initial flavor. There were certainly some tart notes after the fact with a noticeable alcohol flavor at the back of the throat. Nothing too intense, but just enough to remind you you're drinking.

The Golden Delicious w/ Blueberry
The blueberry version was a little different. Still our same base of wildflower honey, golden delicious apples, and vanilla - but this mixture included blueberry syrup and a dash of orange blossom water.

The aroma was very sweet with this one. The clarity was a little higher as well. Possibly because of the additional re-rack to separate them for the different batches. It had dry, fruity notes with no alcoholic aftertaste. My second favorite flavor of all six.

My absolute favorite among all six was the Raspberry with Turkish Honey. Firstly, turkish honey has a gorgeous golden color. That was the first thing that drew me to it. I also love raspberries. There was only one solution here, and that solution was mead. I added some cinnamon to it as well for a little something extra.
The Raspberry and Turkish Honey

The color was stunning from the get go. The combination of bright honey and bright fruit made for a very colorful mead. Slightly cloudy, since raspberries can be very pulpy. Next time some extra filtration might not be such a bad idea. The flavors were perfect (at least to me). A noticeable alcohol aroma, but not too overpowering. The flavor of alcohol was much less intense than the smell. The flavor was sweet with a smooth finish. This one I'm going to let age until Pennsic and enjoy it then.

Oddly enough, our "First Born" mead was my least favorite of all of
Sack Mead "First Born"
them. It was much much sweeter than I personally prefer, but the feedback we got on it was much more forgiving than I had anticipated. Since it was so overly sweet, it was suggested to use it more like a flavored syrup for foods and other drinks. That seemed like the best option to me, personally and depending on how it works in cooking we'll be brewing more and more of it. I think I'll be attempting a chicken recipe with it during an upcoming camping event.

If you happen to find me at an SCA event this summer, please stop me and talk brewing with me! This is a very new venture and I really would like to pick as many brains as possible. I'll also do my best to carry around something to share, but I'm limited on what I have in stock right now. I'll share it if I've got it, though. I look forward to making more and sharing them all! Thanks for reading, and if you do end up trying my mead let me know what you think!

YIS

Lady Elvira Violante Ballesteros


Monday, November 23, 2015

Mead! The Adventure Begins...

Mead has had a long history alongside men during their stay on Earth. It has fantastical stories where it's held in the highest regard among kings and gods.It was once said by Vikings that the mead made from the blood of a god, and honey would turn a man  into a scholar.

Mead, or honey-wine is still a beverage that graces tables to this day.It may not hold as high a covetous repertoire, but still is enjoyed by many.

The earliest surviving description of mead is in the hymns of the Rigveda, a sacred book of Hinduism.
In Ancient Greece, mead was said to be the preferred drink. Aristotle discussed mead in his Meteorologica and elsewhere. The Spanish-Roman naturalist Columella gave a recipe for mead in De re rustica, about AD 60.

"Take rainwater kept for several years, and mix a sextarius* of this water with a pound] of honey. For a weaker mead, mix a sextarius of water with nine ounces of honey. The whole is exposed to the sun for 40 days, and then left on a shelf near the fire. If you have no rain water, then boil spring water."
*- A sextarius is the equivalent to one pint.

What sort of re-enactor would I be if I didn't try my hand at mead at least once? Not to say everyone should try it, but I like medieval food... and I dare say.. LOVE mead and beer. So I asked the help of a friend who had experience, and told me what I'd need.

3 - 5 lbs of honey
1 gallon carboy
1 airlock
1 package of yeast ( I got a champagne yeast)
Water

I had everything I needed... now I just needed to put it all together. Admittedly it took much longer to get everything assembled than originally planned, but it's now fermenting away in a friend's closet.

So we dissolved the honey with water and let it come to temperature. About 120 degrees. Once it reached that point we took a small amount of it and let it cool. We then added the yeast to that and let it sit for about 10 minutes.

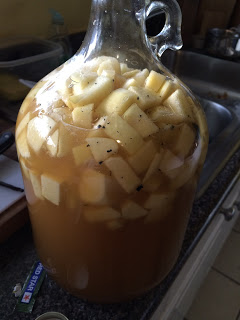
While the yeast sat, my cohort peeled and chopped apples. We began placing them in the carboy with the contents of one full vanilla bean and a dash or orange water (because it's period!)
Here it is! Ready to ferment and become alcoholic and delicious...

We then put the honey and water mixture in the carboy over the apples we already added. Once that was in, we added the pitch (yeast mixture). Once it was added we gave it a nice jostle to make sure everything was incorporated well.

Now a few notes: We probably should've pureed the apples or made them a lot smaller chunks. This make it easier for the yeast to digest and break down. It also takes up less volume in the carboy - therefore giving you more mead when it's done.

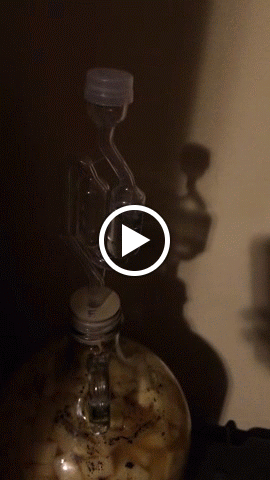
It's been sitting for a little over two weeks now! And it's bubbling away. In about two more weeks, we'll strain it into another carboy without apples, and let it sit for about 6 months!

Here's a short video of it bubbling away! This is what we're calling our "first born" until we taste it...
Once we start our next steps, I'll be sure to try and update. Leave comments below on your own experiences, and thoughts. This is very new, so any and all feedback is very very welcome. Thanks for reading!

Monday, March 23, 2015

Lemon and Lavender Sekanjabin

During the middle ages, a common drink for people was Sekanjabin. It was a vinegar and sugar mixture that was diluted with water. It was believed to promote good health, and is dated back to 10th century Persia. The term ‘sekanjabin’ comes from a persian translation of “sirka anjubin”, meaning “honeyed vinegar”. It’s a common drink served at a lot of SCA events, and is commonly called medieval gatorade.


Within the last year or so I’ve started to dabble in medieval cooking. I’ll be cooking my first dayboard in a few weeks, and thought my table couldn’t go without a drink or two. Sekanjabin is a go to refreshment option, and I’m going with an Andalusian / Spanish style meal so it only seemed appropriate.

I recently acquired some lavender, and a small herb garden that has some lemon verbena. I haven’t been able to find documentation for it before the 1700s, but the flavor and smells it releases are totally worth it. Lemon and Lavender are becoming a really popular flavor combination too, and I thought why not try making a sekanjabin with this same flavor combo.

I started with the basic mixture of vinegar and sugar. I took two cups of white distilled vinegar, and one and a half cups of sugar and put them over medium heat. I stirred it all together until the sugar dissolved, and then added my herbs.

I wasn’t sure how much to add so I took a few small sprigs of the lemon verbena (about 10-15 leaves) and a small handful of lavender. I stirred it all together over a gentle boil until the lavender was no longer purple, and the leaves wilted. The smell of course left something to be desired naturally. All I could smell was vinegar. Don’t let that discourage you, though!

After it was done cooking, I took the mixture and poured it through a strainer into a mason jar. No one wants a solid piece of lavender in their water. I let it cool until it was room temperature and then decided to test it. I added a very small amount to a 4 oz glass of water. About a tablespoon.


SUCCESS! I feel the lavender flavor didn’t come across as much, but you smell lavender as you drink it, and you taste lemon. The lemon flavor was pretty strong, but made for an interesting drink all together. The amount I used is a very small batch, about half a standard size mason jar (so about 3 ounces).  Obviously you can increase accordingly. Let me know if you like it, or maybe try a variation of the same! Thanks for reading!

Lady Elvira’s Lavender and Lemon Sekanjabin


2 cups of white distilled vinegar
1½ cups of sugar
3 Tbsp of dried lavender
1 Sprig (about 3-4 inches) of fresh Lemon Verbena


Add vinegar, and sugar to a small saucepan and put over medium heat. Stir until the sugar has dissolved. Bring the mixture to a soft boil and add your lavender and lemon verbena. Stir this until the lavender buds have lost their color and the lemon verbena leaves have significantly wilted (about 5-10 minutes).

Pour the mixture through a strainer, or cheesecloth (something with small enough gaps to catch your lavender and leaves) into a small container. A mason jar works well for this. Wipe off your container as the mixture will get a little sticky.

Add about 1 to 2 tablespoons, depending on your taste to a glass of hot, or iced water and enjoy!